Graphic Products Coursework: Research Section Help Page
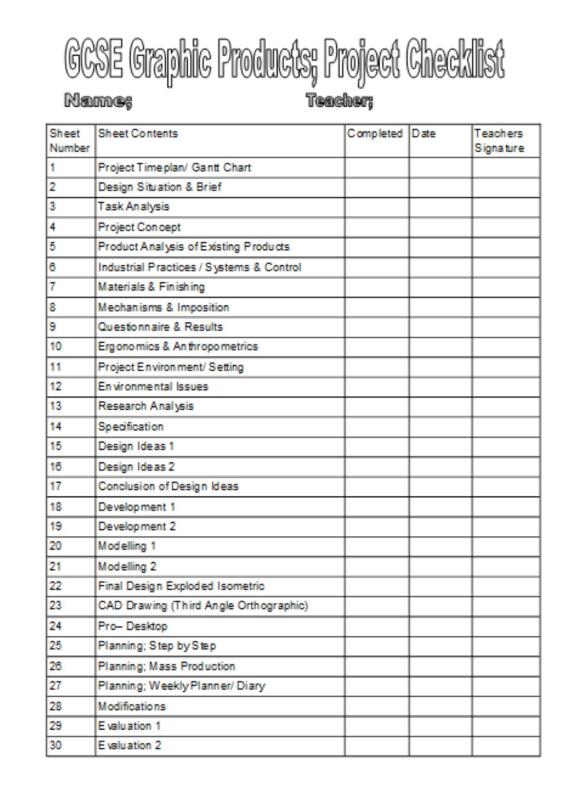
Below is a list of all the sheets you should have in your coursework folder in the Research Section. Further down the page is a detailed explanation of what should be included in each page. Where there is information to help you with that page online, I have given you links that will open in a new window.
1. Project Timeplan/ Gantt Chart
2. Design Situation & Brief
3. Task Analysis
4. Project Concept
5. Product Analysis of Existing Products
6. Industrial Practices / Systems & Control
7. Materials & Finishing
8. Mechanisms & Imposition
9. Questionnaire & Results
10. Ergonomics & Anthropometrics
11. Project Environment/ Setting
12. Environmental Issues
13. Research Analysis
Project Timeplan/ Gantt Chart
This is a way that projects are planned over a set period of time in industry. It will gain you marks in your coursework for both the planning and industrial practices marks.
You need to use Microsoft Excel (or another spreadsheet software) to produce the plan.
Column A should contain all of the tasks that you need to complete for your coursework. You can get these tasks from your project tracking list (click below to download the sheet if you have lost yours!)
You need to use Microsoft Excel (or another spreadsheet software) to produce the plan.
Column A should contain all of the tasks that you need to complete for your coursework. You can get these tasks from your project tracking list (click below to download the sheet if you have lost yours!)
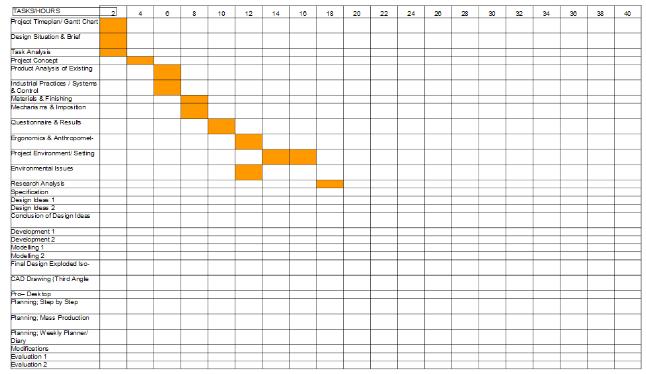
Example of an incomplete gantt chart
Row 1 should include the hours available to you to complete the tasks. This is 40hours for your coursework. Do this in 2 hour blocks.
Think carefully about how long each task will take; remember some pages will only take 1 hour and so you will be able to fit more than 1 task into each 2 hour block.
Also remember that the development section includes your practical work, which needs to take up a lot of time as it is awarded 60% of your overall coursework marks!
Design Situation & Brief
This takes up the LEFT HAND side of an A3 design sheet.
The Design Situation is a description of the problem that you are attempting to solve.
It is a paragraph of text (writing) that describes the problem. You don't say how you are going to solve the problem, only what it is.
The first sentence should explain the problem briefly. The following sentences should explain the problems in more detail.
For example;
A friend enjoys playing computer games on his Playstation 3 console and listening to music, but has a storage problem in his bedroom. The friend lives with his parents and so all of his belongings are confined to his bedroom. He often has friends round to visit and play computer games with. There is no existing storage in his bedroom for his Playstation Console & games, Ipod dock, stereo or CDs. All of his CDs and games get left on the floor and broken due to this lack of storage.
The Design Brief
This is a piece of text (writing) that explains what you are going to design and make to solve the problem.
Start the Design Brief with “I am going to design and make…” then a general description of what it is you think will solve the design problem.
Don’t be too specific! It should be flexible enough to allow your research and design work to develop over the course of the project.
Don’t be too specific when mentioning things like materials, instead state the properties the materials will need to have.
Mention points such as safety, general size, functions (what it will need to do) target market (who will buy it?).
Task Analysis
This takes up the RIGHT HAND side of an A3 design sheet (the one that has your Design Brief & Situation on the left hand side!)
It is a spider diagram containing all of the areas you need to think about when designing your product.
The centre of the diagram should have the words “Task Analysis” in it. Then you will need a leg for each important area you will need to look into.
Include areas such as Aesthetics/Design, Cost, Customer/Target Market, Ergonomics, Environment, Safety, Size, Function, Materials.
Then expand each leg with detail about that area, for example;

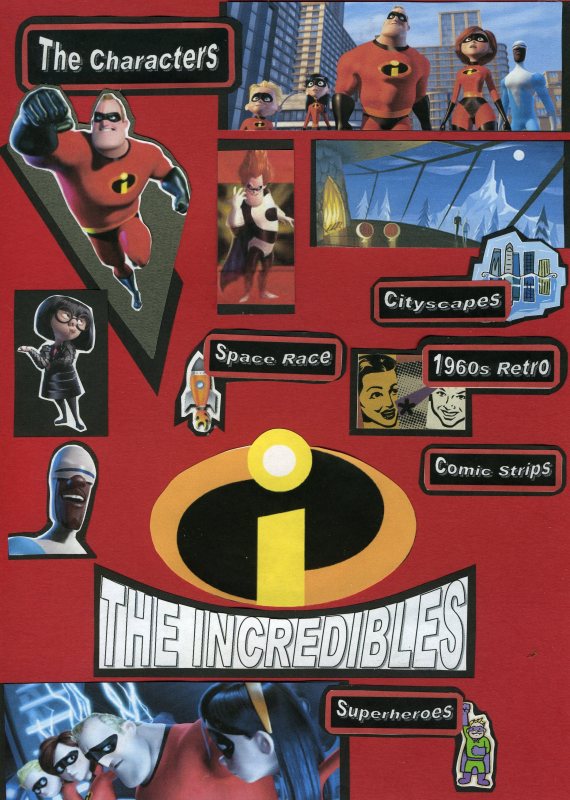
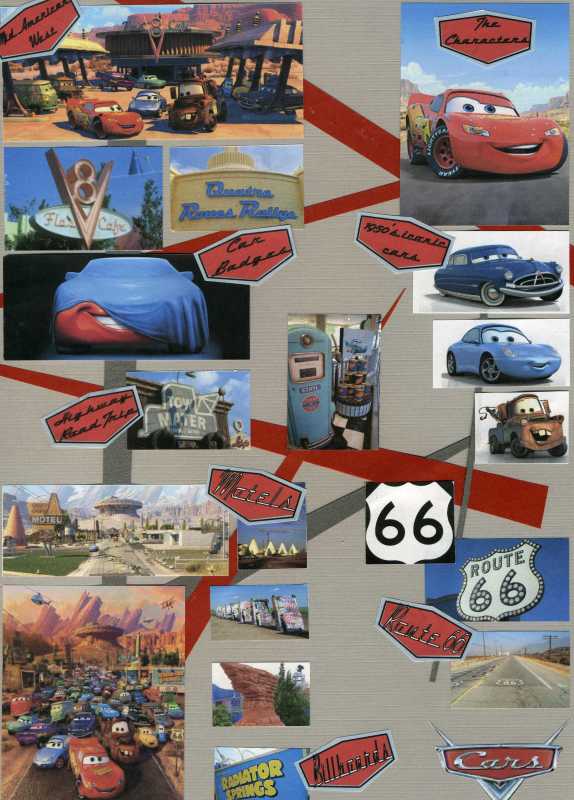
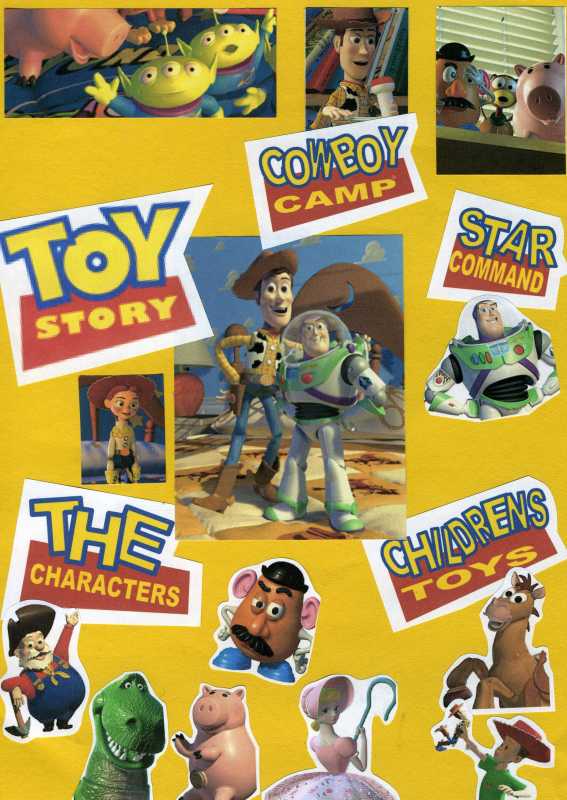
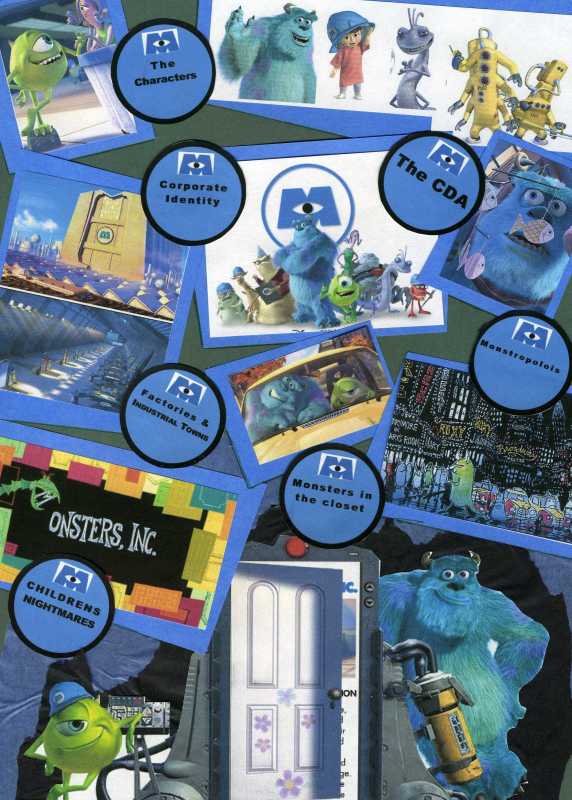
Project Concept
This is a pictoral collage that shows the theme/concept of your project. It SHOULD NOT show any images of what your are designing, rather it should include;
* Images that will inspire your designs; include shapes, forms and images reflecting your theme eg retro, the jungle.
* Colours that you might use; this could be in the form of colour swatches.
* Typography styles that match your theme; include key words that some up your concept in the chosen typography.
* Textures
It must be presented superbly, using a mounting method and coloured paper and card.
It needs to be A4 landscape, so it can be mounted on an A3 border sheet when it is finished.
Below are some examples of Pixar Movie concept boards.
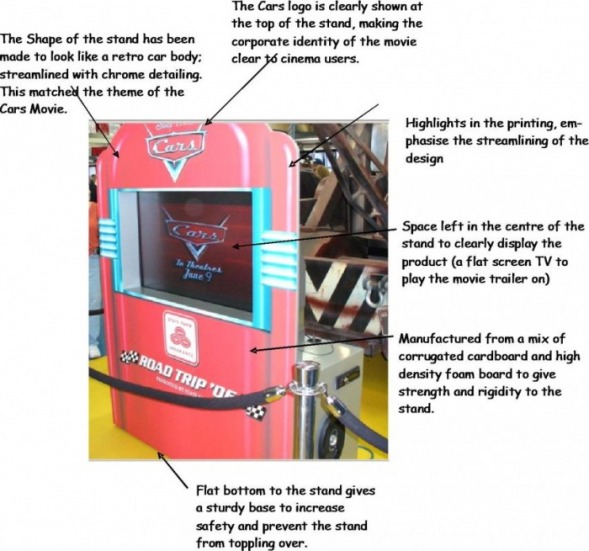
Product Analysis of Exisiting Products
This should be divided into the 4 areas of your project: The 3D Item (MP3 player, USB Stick), The Packaging, The POS STand and The Promotional Items.
Divide the A3 sheet into 4. In each quarter, find 2-3 images of existing products from that area.
Then Analyse them, using ACCESS FM to help you. Think specifically about how the design features could help you and your own designs.
A grade pupils should evaluating against criteria as well as annotating the products.
Evaluating against ACCESS FM Criteria; for higher grade candidates
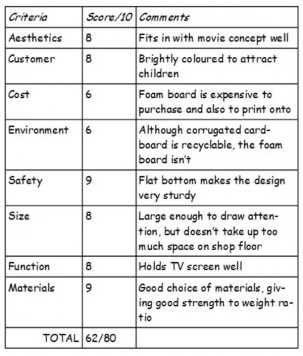
You need to complete a table to evaluate against criteria for each product. This is as well as completing the analysis through annotation shown above.
Industrial Practices
This page is approached in 2 halves.
The LEFT HAND side of the page needs information on what CAD, CAM and CIM are. You need to include examples of the CAD/CAM we have in school and how these could be possibly used in your project.
CLICK HERE to visit the area of this website with information about CAD/CAM & CIM.
You also need information on scales of manufacture (one off-, Batch, Mass & JIT Production) CLICK HERE to visit the area of this website with information about this.
The RIGHT HAND side of the page needs to cover quality control in Graphic Products.
You need to include what is QA (Quality Assurance) & QC (Quality Control) and how is it used in mass manufacturing of graphic products. Include information on Registration Marks, Colour Bars, Densitometers, Crop Marks & tolerances. CLICK HERE to visit the area of this website with information about this.
CLICK HERE for the image used in class to show these QC checks.
Materials & Finishing
This is split over two pages of A3. The first page is research into possible materials for your project, the second page is research into special printing finishes and industrial printing techniques.
Materials
This page needs to be laid out in the format given below. You must research three areas: Modelling Materials, Packaging Materials and POS Materials.
As a minimum, each area must include the material name, and image, the typical properties and possible uses in your project. If you are an A/B student, you must include advantages and disadvantages of using each material.
Possible materials for research could include:
Modelling Materials
Expanded Polystyrene Foam/ Machining Foams for CAM use
Balsa Wood
Dowel
Corroflute
Packaging Materials
Solid White Board
Duplex Board
Corrugated Board
Laminated Foil Board
POS Materials
Low Density Foam Board
High Density Foam Board
Softwood
Acrylic
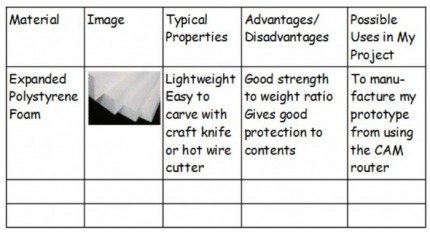
suggested layout for each section of Materials Research
Finishes
Divide your page into two. The LEFT HAND side needs to cover special finishing techniques. The RIGHT HAND side needs to cover industrial printing
methods.
Special Printing Finishes
First, include a paragraph explaining why special printing techniques are used and what you have to consider as a designer.
Include information on a minimum of 3 of the techniques. Explain what they are, how they are applied and how you could use them in your project. A/B students must include information on all of them.
For additional marks collect actual examples of the techniques and use a digital camera to record this.
CLICK HERE for a link to information on the techniques.
Industrial Printing Methods
First, explain how printing in industry work, including information on CYMK, Colour Separation & Inks.
Next explain each of the following printing techniques in detail, including a diagram. State what in your project they would be used to print and why.
CLICK HERE for a link to information on printing methods
Mechanisms & Imposition
Mechanisms should fill the LEFT HAND side of an A3 page. Include a thumbnail example of each type of mechanism (v-fold, mouth, internal stand, rotary) along with a write up of how they work and what you could use them for in your project. Thumbnails must be mounted neatly using a suitable mounting method.
CLICK HERE for information on mechanisms.
CLICK HERE for information on mechanisms.

Lost the mechanisms sheet MRS G gave you? Click here to download one!
Impositions should fill the RIGHT HAND side of the sheet. You need to include a thumbnail sample of an 8 page work and turn layout, mounted using a suitable mounting method.
You should include a NET/Layout of the work and turn before you trimmed and stapled it.
Also include an explanation of what imposition is and how you will need to use it in our coursework (eg to make a leaflet)
CLICK HERE for a link to further information
You should include a NET/Layout of the work and turn before you trimmed and stapled it.
Also include an explanation of what imposition is and how you will need to use it in our coursework (eg to make a leaflet)
CLICK HERE for a link to further information
Questionnaire & Results
You need to write a questionnaire, in leaflet format (use the templates in MS Publisher to help set up the page). The questionnaire needs to find our primary information about your chosen target market and their likes/ dislikes. Remember CLOSED questions (where the person ticks a box, gives something a rating, or rank orders things) are easier to gather reulst from than OPEN questions where they just write on a line.
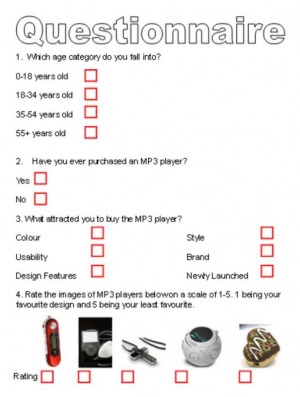
example of CLOSED questions
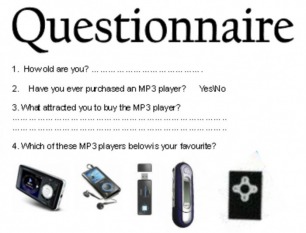
example of OPEN questions
Questionnaire Results
Once you have asked a minimum of 10 people from your target market, you need to collate your results and produce some pictographs. You must use pictographs and not standard bar or pie charts! You can either do your pictographs by hand or by using MS Excel. CLICK HERE for information on how to do pictographs in MS Excel.
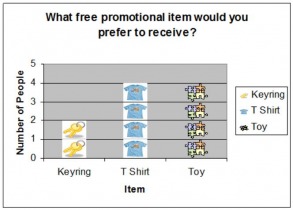
example of pictograph produced in MS Excel
example of professionally produced pictographs
Project Location & Setting
You need to research the typical location that your product will be sold in, displayed on your Point Of Sale Stand.
The page must include as a minimum;
A Photograph of a shop you have visited, showing a possible location for your POS stand
A Plan (from above) drawing of the shop showing the layout (This must include estimated dimensions/size of the shop)
A Conclusion, explaning how the location will influence your design, eg the style, size, your choice between fllor or counter standing.
B and above grade students should include a short interview with a typical customer of the shop, asking them what attracts them to buy certain products. Think carefully about the questions that you ask, and make them specific
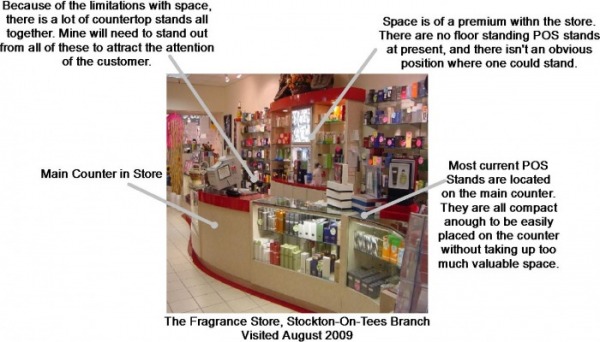
Example of annotated photograph of the shop
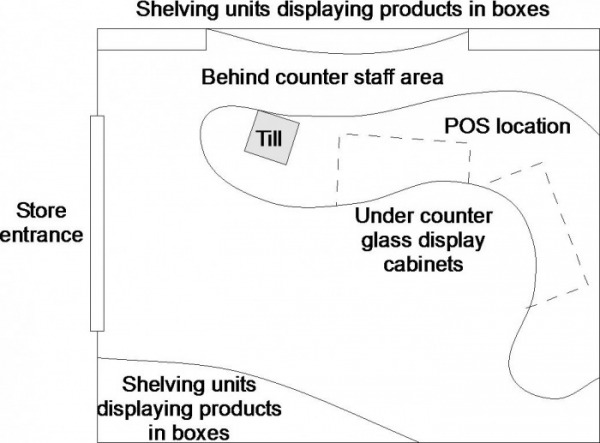
Example of a plan drawing of the shop
